.png)
Stone Kitchen Island Ideas: 7 Stunning Designs for Perth Kitchens
- Master Tops

- Aug 11, 2025
- 8 min read
You walk into your kitchen and right in the middle is a gorgeous stone island that somehow makes cooking a truly enjoyable experience. It’s not just about looks.
This kitchen island gives you room to chop, chat, and even sneak in breakfast at the same time. With plenty of counter space, built-in seating, and rock-solid surfaces designed for real family life, it’s both beautiful and built to last.
Here’s your guide to the 7 stone kitchen island ideas for modern Perth homes. We’ll talk shapes and layouts, compare materials from porcelain to silica-free quartz, and even walk you through the costs.
So, keep reading for all the expert tips you need to plan the perfect kitchen island bench for your home.
7 Stone Kitchen Island Ideas for Stylish & Functional Perth Kitchens
Each of the following kitchen island ideas brings beauty, function, and that ‘wow’ factor to your space. So, let’s make your kitchen both stylish and practical with these eye-catching benchtop designs:
Coastal Beach-Style Kitchen Island
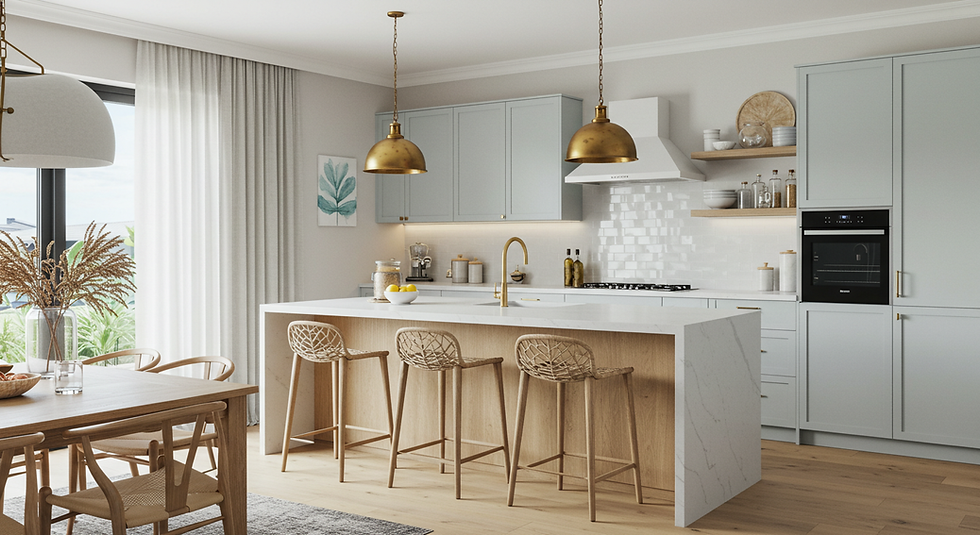
Bring the airy feeling of the beach into your kitchen. A coastal-style island uses light, sandy tones and natural textures to create a relaxed, sun-soaked vibe.
Key Features:
Pale Dekton or quartzite surface in matte finish
Weathered or driftwood bar stools
Brass or rattan pendant lights
Subtle coastal colour palette (soft blues, warm wood)
Kitchen Island Styling Tips: Layer in beachy accents like sea-glass décor. Go for open shelving for airy display, and linen curtains to soften the light. Use woven or cane stools to complement the island’s light stone top.
Waterfall Edge Porcelain Kitchen Island
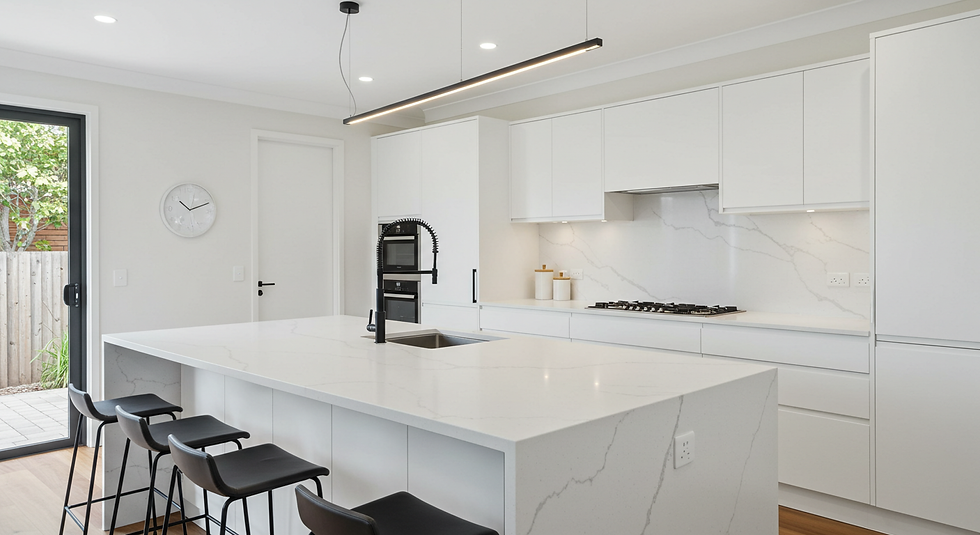
For ultra-modern luxury, choose a waterfall-edge island where the stone slab wraps seamlessly down the sides. An all-white or gray porcelain island looks sleek and sculptural.
Key Features:
Continuous porcelain or Dekton slab wrapping down both ends (waterfall edge)
Matte or honed finish
Integrated charging stations or small appliances built in
Kitchen Island Styling Tips: Keep it minimalist. Let the monolithic island shine by pairing it with handleless cabinets and flush surfaces. Accent with metallic or matte black fixtures to add contrast.
Two-Tone Natural Stone & Quartz Kitchen Island

Make a statement by mixing materials. One popular idea is a two-tone island. For example, a darker natural stone prep area paired with a lighter engineered quartz breakfast bar. This contrast adds visual interest and defines zones.
Key Features:
Contrasting countertops; white quartz overhang and gray granite prep area
Hidden storage or wine racks in the island base
Edge details that show both layers
Kitchen Island Styling Tips: Use the darker tone on the more functional side (sink/cooktop) and the lighter on the seating side to keep the island open and bright. Add pendant lights above each section to highlight the contrast.
Silica-Free Quartz Kitchen Island with Breakfast Bar

Show off an eco-conscious island made from silica-free quartz for a healthy, high-tech surface. These pure-engineered stones come in stunning colors and last for decades.
Key Features:
· Non-toxic quartz benchtop; marble-look or bold veined design
· Extended overhang for seating
· Built-in LED under-lighting or a footrest
Kitchen Island Styling Tips: Overhang should be heat-resistant. Quartz handles up to 150°C without damage. Install soft LED strip lights under the overhang to create a floating breakfast bar effect. Pair with low-back stools to keep lines clean.
Curved Peninsula Kitchen Island for Open-Plan Living

Step beyond rectangles with a curved peninsula or island that softens edges and improves flow. A gently curved or angled island works great in an open-plan Perth home, guiding the eye and traffic seamlessly.
Key Features:
· Rounded quartz or granite countertop edges
· Peninsular design that extends from a counter run
· Back-bar shelving or a wine rack built into the curve
· Accessible indoor-outdoor flow to patio
Kitchen Island Styling Tips: Use the curve to zone areas. One side for prep, one for eating. Mount a large round pendant above to echo the island’s shape. Keep circulation clear on all accessible sides.
Polished Granite Kitchen Island with Wooden Accent
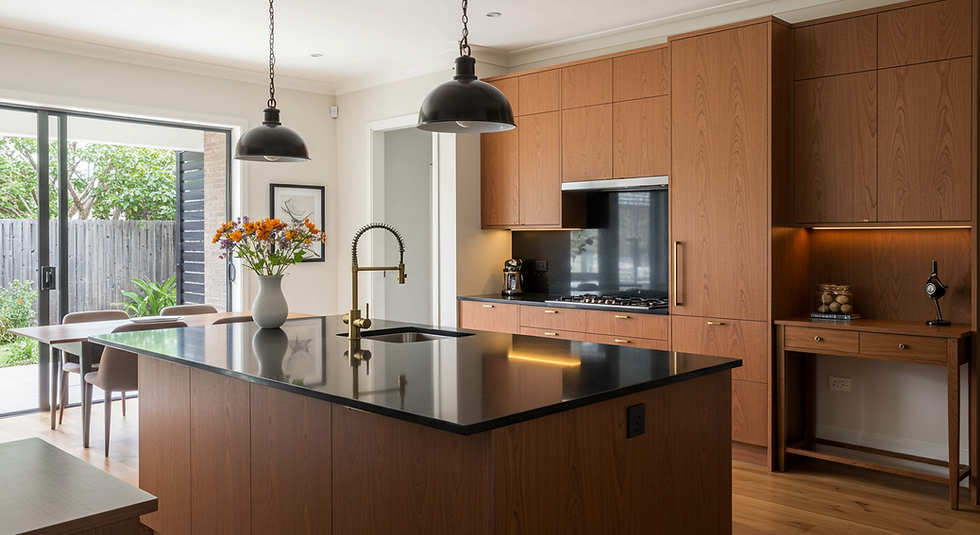
For rich warmth, pair a polished granite island top with a wood or veneer base. This signals to traditional craftsmanship with a modern edge.
Key Features:
· Dark or white granite countertop with polished finish
· Wood pedestal or shiplap paneling on island base
· Smooth honed edge detail
· Statement brass sink or cooktop hardware
Kitchen Island Styling Tips: Coordinate the wood tone of the island base with your floor or adjacent cabinetry for cohesion. Under-cabinet lighting or a wood console table nearby can echo the texture.
Floating Stone Kitchen Island with Integrated Lighting

Create drama with a floating island effect by recessing the base and adding lighting. A slim, wall-mounted bench or island with LED under-capsule lighting looks like it’s floating.
Key Features:
· Thick stone island top (marble or quartz) with cantilevered edges
· Recessed kickboard with hidden LED strips
· Minimalist hardware and cabinetry
Kitchen Island Styling Tips: Use a dark finish on the underside or leg cavity so the light effect is more pronounced. Keep the overhead space uncluttered. Floating islands pair well with simple linear or no-hanging-light fixtures to enhance the clean look.
Choosing the Right Shape for Your Stone Kitchen Island: 5 Practical Layouts
The shape of your island affects how you work and socialise in the kitchen. Here are common shapes and why they work:
1) Rectangular Kitchen Islands
A classic, versatile shape that maximises prep space. It’s efficient for the traditional work-triangle ‘sink–stove–fridge’ and suits galley or open-plan kitchens.
Best for long kitchens or open layouts.
Styling tip: Line up bar stools along one long side to balance seating.
2) L-Shaped Islands (Peninsula)
Extends from existing countertops to define separate cooking and dining zones, without needing a full walk-around space.
Best for U-shaped or L-shaped kitchens where a partial island (peninsula) creates an island feel.
Styling tip: Add shelves or cabinets on the returning short end for extra storage and display.
3) U-Shaped Islands
U-shaped kitchen island offers countertop on three sides. It is ideal if multiple people cook or help out simultaneously. There’s prep on one side, sink/cooktop on another, and dining on the third.
Best for large open kitchens with room to walk all around.
Styling tip: Assign each leg of the “U” a purpose like prep, cooking, seating. Use pendant lighting to highlight each zone.
4) Circular & Oval Islands
Circular or oval island softens hard edges and encourages conversation; everyone faces each other.
Best for breakfast nooks or central gathering spots in large open kitchens or adjacent dining areas.
Styling tip: Hang a round pendant or chandelier above to mimic the island’s shape and make a focal point.
5) Custom Kitchen Island Shapes
Custom island is tailored to unique floorplans or appliances. It can follow angled walls or include cutouts.
Best for kitchens with irregular layouts or bespoke features (e.g., a built-in barbecue or alcove).
Styling tip: Work with your kitchen makers in Perth to carve special edge profiles or integrate drains/slots that match your appliances.
Pro Tips:
Consider 1–1.2 meters of Clearance Zone: For smooth traffic flow, keep about 1–1.2 meters of clearance on all sides of the island. This gives enough space to open drawers and move around safely. Ensure at least 1m between the island and any opposing counters or appliances so doors of dishwasher or oven can swing open fully.
Go for Multi-use Kitchen Islands: Today’s islands aren’t just for cooking. They can incorporate prep sinks, cooktops, seating, storage, wine fridges, even pop-up outlets. Plan zones for chopping, casual dining, and storage in advance. Think through how your family uses the space: a mix of bench, bar, and bookshelf can make the island a true hub of the home.
Kitchen Island Material Comparison & Cost Guide
Choosing the right material involves weighing durability, maintenance, and price. The table below compares popular choices:
Material | Durability/Heat | Maintenance | Cost (approx.) |
Natural Stone (Granite) |
| Periodic sealing recommended | $600–$1200/m² |
Porcelain/Dekton |
| Wipes clean (non-porous) | $1500–$1,600/m² (slab) |
Silica-Free Quartz |
| No sealing; clean with mild soap | $650–$1,200/m² (installed) |
Dekton (Sintered) |
| Non-porous, easy care | $1500–$1,600/m² (premium) |
So, which stone kitchen island material is right for you?
To decide, ask yourself:
Do you cook often with high heat? Dekton excels.
Want low maintenance? Go for porcelain/quartz.
Love natural patterns? Pick granite or quartzite.
If you want a classic luxury look, go natural granite/marble (with proper sealing). For ultra-durable, outdoor-capable surfaces, choose Dekton or porcelain. For an eco-friendly, low-tox option, silica-free quartz checks all boxes.
Still unsure? Chat to our kitchen makers in Perth and we’ll match you to the perfect material.
Dreaming of a stunning stone island that’s both beautiful and built to last? Need benchtops that bring style and practicality all together?
Elevate Your Kitchen with High-End Stone Kitchen Islands Master Tops
At Master Tops, we’ve spent over 20 years crafting high-end stone benchtops in Perth, so we know exactly how a well-designed island can elevate both the look and workflow of your kitchen.
Let us help you choose the ideal shape and stone that fit your lifestyle and budget.
We specialise in silica-free stone kitchen islands, premium porcelain islands, and custom benchtops tailored for Perth homes.
Contact us today to create a kitchen island that wows your guests and makes your daily routines effortless.
Browse our gallery for stunning kitchen benchtop ideas.
FAQs about Stone Kitchen Islands
Q1. What is the best stone for a kitchen island?
It depends on your needs. Granite and engineered quartz are top picks for durability and a timeless look. Quartz (like Caesarstone) offers a huge range of colours and is non-porous. Silica-free quartz gives all the benefits of quartz plus no toxic silica. Marble looks luxurious but needs care. Our experts can help weigh pros/cons for your lifestyle.
Q2. How much clearance do I need around my kitchen island?
Plan for at least 1 meter (about 39 inches) of free space on each side of the island. So, you can easily open cabinets, doors and move safely. This ensures you can walk around the island and access ovens/drawers without squeezing.
Q4. How long does it take to install a kitchen island in Perth?
Once your stone is templated, Master Tops completes installation in about a week (5–8 days). We fabricate the stone (cutting, polishing, finishing) off-site, then install and seal your new island quickly. Of course, the overall kitchen renovation can take longer, but the benchtop install itself is relatively fast.
Q5. Does a kitchen island increase value?
Absolutely. Islands add functional space and become a focal point buyers love. Adding a kitchen island with seating is one of the highest-ROI kitchen upgrades. Not only does it make your home more attractive on the market, but you’ll enjoy it every day in the meantime.
Q6. Is it a good idea to have a sink in a kitchen island?
Yes, having a sink on the island can be great for socializing and efficiency. With an island sink, you can face outwards and chat with guests or keep an eye on kids while you work. It also frees up wall counter space for prep or cooking.
Q7. Should a kitchen island be lighter or darker than the rest?
There’s no strict rule, but many kitchen makers treat the island as an accent piece. In a light kitchen, a darker island adds depth and contrast. Conversely, if your cabinets are dark, a lighter or white island can brighten the space.


Comments